Emacs: Maintaining proper indentation in indentation-sensitive programming languages

As codebases grow, maintaining proper indentation becomes increasingly difficult, especially in languages like Python or YAML, where indentation is not just a matter of style but an important part of the syntax. When working with large code blocks or deeply nested structures, it’s easy to lose track of the correct indentation level, leading to errors and decreased readability. In this post, we’ll explore Emacs packages and an Elisp code snippet that can help manage indentation in these indentation-sensitive languages.

Code snippet: Indenting new lines based on previous non-blank line

The following code snippet configures Emacs to indent based on the indentation of the previous non-blank line:

;; This ensures that pressing Enter will insert a new line and indent it.
(global-set-key (kbd "RET") #'newline-and-indent)

;; Indentation based on the indentation of the previous non-blank line.
(setq-default indent-line-function #'indent-relative-first-indent-point)

;; In modes such as `text-mode', pressing Enter multiple times removes
;; the indentation. The following fixes the issue and ensures that text
;; is properly indented using `indent-relative' or
;; `indent-relative-first-indent-point'.
(setq-default indent-line-ignored-functions '())Code language: Lisp (lisp)

Emacs package: outline-indent.el (Code folding)

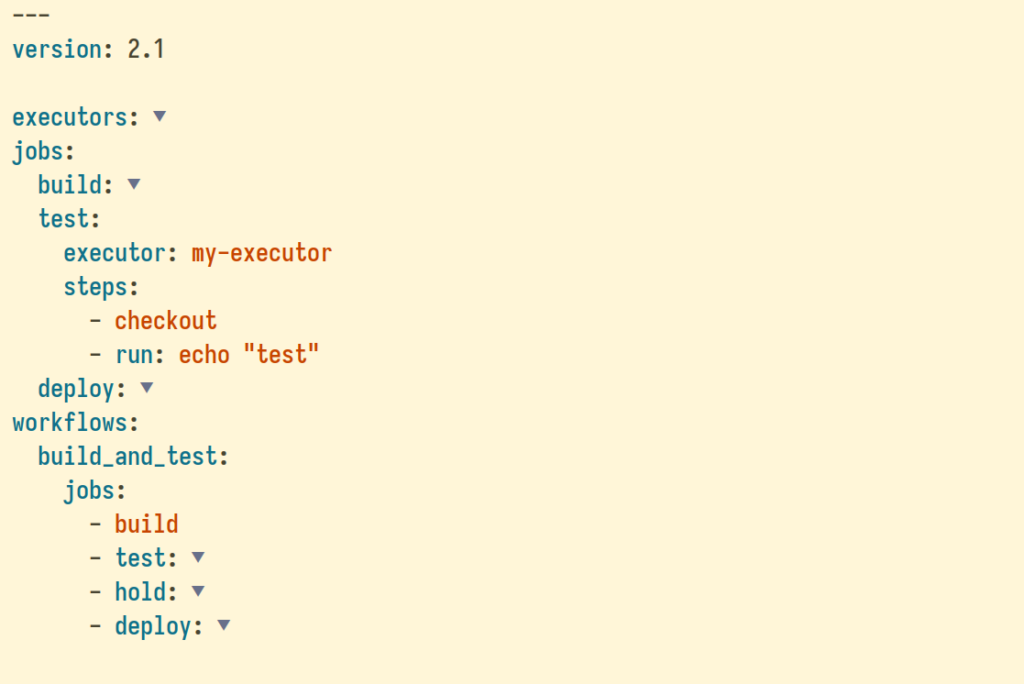
The outline-indent.el Emacs package provides a minor mode that enables code folding based on indentation levels for various indentation-based text files, such as YAML, Python, and any other indented text files.

To install the outline-indent from MELPA, add the following code to your Emacs init file:

(use-package outline-indent
  :ensure t
  :commands (outline-indent-minor-mode
             outline-indent-insert-heading)
  :hook ((yaml-mode . outline-indent-minor-mode)
         (yaml-ts-mode . outline-indent-minor-mode)
         (python-mode . outline-indent-minor-mode)
         (python-ts-mode . outline-indent-minor-mode))
  :custom
  (outline-indent-ellipsis " ▼ "))Code language: Lisp (lisp)

In addition to code folding, outline-indent allows:

  • Moving indented blocks up and down.
  • Indenting/unindenting to adjust indentation levels.
  • Inserting a new line with the same indentation level as the current line.
  • Move backward/forward to the indentation level of the current line.
  • Customizing the ellipsis to replace the default “…” with something more visually appealing, such as “▼”.
  • Selecting the indented block with.
  • And other features.

Emacs Package: dtrt-indent (Guessing the original indentation offset)

The dtrt-indent provides an Emacs minor mode that detects the original indentation offset used in source code files and automatically adjusts Emacs settings accordingly, making it easier to edit files created with different indentation styles.

(use-package dtrt-indent
  :ensure t
  :commands (dtrt-indent-global-mode
             dtrt-indent-mode
             dtrt-indent-adapt
             dtrt-indent-undo
             dtrt-indent-diagnosis
             dtrt-indent-highlight)
  :config
  (dtrt-indent-global-mode))Code language: Lisp (lisp)

Emacs package: indent-bars (Indentation guides)

The indent-bars Emacs package, written by JD Smith, enhances code readability by providing visual indentation guides, optimized for speed and customization. It supports both space and tab-based indentation and offers optional tree-sitter integration, which includes features like scope focus. The appearance of the guide bars is highly customizable, allowing you to adjust their color, blending, width, position, and even apply a zigzag pattern. Depth-based coloring with a customizable cyclical palette adds clarity to nested structures. The package also features fast current-depth highlighting, configurable bar changes, and the ability to display bars on blank lines. Additionally, it maintains consistent bar depth within multi-line strings and lists, and it works seamlessly in terminal environments using a vertical bar character. (Send your customizations to JD Smith, the author of indent-bars. He mentioned on Reddit that, “If you or others have customized the bar style settings, I’d be happy to add them to the examples page”.)

The indent-bars package isn’t available in any package database yet, but you can install it using straight.

  1. If you haven’t already done so, add the straight.el bootstrap code to your init file.
  2. After that, add the following code to your Emacs init file:
(use-package indent-bars
  :ensure t
  :commands indent-bars-mode
  :straight (indent-bars
             :type git
             :host github
             :repo "jdtsmith/indent-bars")
  :hook ((yaml-mode . indent-bars-mode)
         (yaml-ts-mode . indent-bars-mode)
         (python-mode . indent-bars-mode)
         (python-ts-mode . indent-bars-mode))
  :custom
  (indent-bars-prefer-character t))Code language: Lisp (lisp)

The indent-bars fancy guide bars when indent-bars-prefer-character is set to nil:

If you are using Linux or macOS (not PGTK on Linux, NS on macOS, or Windows), try setting the indent-bars-prefer-character variable to nil to make indent-bars display fancy guide bars using the :stipple face attribute (see indent-bars compatibility). On macOS, it only works if you are using the non-NS version of Emacs, known as emacs-mac-app, which can be installed from MacPorts using the emacs-mac-app or emacs-mac-app-devel package.

You can have Emacs automatically set the indent-bars-prefer-character variable to nil when the window system is PGTK or NS, where the stipple attribute is not supported and using the character is preferred, with the following Elisp code:

;; Make the indent-bars package decide when to use the stipple attribute
(setq indent-bars-prefer-character
      (if (memq initial-window-system '(pgtk ns)) t))Code language: Lisp (lisp)

Code snippet: Inserting a new line before the next line that has the same or less indentation level

(If you’re using outline-indent.el, there’s no need for the Elisp code below. You can simply use the (outline-indent-insert-heading) function.)

You can use the following function to inserts a new line just before the next line that has the same or less indentation level:

(defun my-insert-line-before-same-indentation ()
  "Insert a new line with the same indentation level as the current line.
The line is inserted just before the next line that shares the same or less
indentation level. This function finds the nearest non-empty line with the same
or less indentation as the current line and inserts a new line before it.

This function is part of the outline-indent (MELPA) Emacs package.
It was extracted from the function (outline-indent-insert-heading)
written by James Cherti and distributed under the GPL 3.0 or later license."
  (interactive)
  (let ((initial-indentation nil)
        (found-point nil))
    (save-excursion
      (beginning-of-visual-line)
      (setq initial-indentation (current-indentation))
      (while (and (not found-point) (not (eobp)))
        (forward-line 1)
        (if (and (>= initial-indentation (current-indentation))
                 (not (looking-at-p "^[ \t]*$")))
            (setq found-point (point))))
      (when (and (not found-point) (eobp))
        (setq found-point (point))))
    (when found-point
      (goto-char found-point)
      (forward-line -1)
      (end-of-line)
      (newline)
      (indent-to initial-indentation))))Code language: Lisp (lisp)

If you are an Emacs Evil mode user, here’s an additional function that switches to insert mode after inserting a new line with matching indentation:

(with-eval-after-load "evil"
  (defun my-evil-insert-line-before-same-indentation ()
    "Insert a new line with the same indentation level as the current line."
    (interactive)
    (my-insert-line-before-same-indentation)
    (evil-insert-state))

  ;; Pressing Ctrl-Enter calls my-evil-insert-line-before-same-indentation 
  (evil-define-key '(normal insert) 'global (kbd "C-<return>")
    #'my-evil-insert-line-before-same-indentation))Code language: Lisp (lisp)

Built-in feature: indent-rigidly

The indent-rigidly built-in Emacs feature (C-x TAB) allows for manual adjustment of indentation by shifting a block of text left or right. It makes it easy to adjust indentation levels interactively. This can be especially useful for fine-tuning indentation in code or text where automatic tools might not always get it right. (By the way, moving the entire block with indent-rigidly is similar to the promote/demote functions in the outline-indent.el package.)

Related links

  • Emacs documentation: Indentation
  • block-nav: Allows navigation through code based on indentation.
  • aggressive-indent: Automatically maintains proper indentation throughout your code. Works better with languages such as Elisp, C/C++, Javascript, CSS…
  • Combobulate: Combobulate enhances structured editing and movement for various programming languages by leveraging Emacs 29’s tree-sitter library. Combobulate uses tree-sitter’s concrete syntax tree for precise code analysis, resulting in more accurate movement and editing.
  • expand-region: Expand the selected region by semantic units by repeatedly pressing the key until the desired area is highlighted.
  • outline-indent.el alternative:
    • origami.el: No longer maintained, slow, and have known to have bugs that affect its reliability and performance.
    • yafolding.el: No longer maintained and slow. It does not work out of the box with Evil mode and evil-collection.
  • Indent-bars alternatives (they work, are no longer maintained):
    • indent-guide: An older indent-bars alternative that uses overlays with | characters. There are some performance concerns reported, and it is incompatible with company and other similar in-buffer modes. (indent-bars is better.)
    • highlight-indentation-mode: An indent-bars alternative that uses overlays to display indentation guides and includes a mode for showing the current indentation level. It offers partial support for guides on blank lines. (indent-bars is better.)
    • highlight-indent-guides: An indent-bars alternative that offers a highly customizable indentation highlighting, featuring options for color, style, and current depth indication. (indent-bars is better.)
    • hl-indent-scope: An indent-bars alternative that highlights indentation based on language scope, requiring specific support for each language, and uses overlays to display indentation guides. (indent-bars is better.)
    • visual-indentation-mode: An indent-bars alternative that uses full character-based alternating color indentation guides. The package is now archived. (indent-bars is better.)

Conclusion

This article has highlighted various Emacs packages and Elisp code snippets to enhance indentation management in indentation sensitive programming languages.

It took me a while to find the packages mentioned in this article, as I had to test many of them. Unfortunately, many popular packages are unmaintained, slow, or have unresolved bugs. I’ve only shared the packages that work flawlessly. For instance, while the Origami package is widely used, it’s slow, buggy, and no longer maintained. The outline-indent.el package is a more modern alternative for folding indented text, aligning with the trend of utilizing built-in Emacs features (like Corfu, Cape, Vertico, Consult…). Similarly, indent-bars provides a more refined experience than older packages like highlight-indent-guides and highlight-indentation.

If you have any other packages or Elisp code you rely on for managing indentation in sensitive languages, I’d love to hear about them.

Emacs .dir-locals.el – Add project path to $PYTHONPATH (Python Development in Emacs)

In order to ensure that the processes executed by Emacs and its packages, such as Flycheck or Flymake, can access the Python modules of a project, it is essential to correctly configure the $PYTHONPATH environment variable.

This article provides a solution by introducing a .dir-locals.el file that adds the directory path of .dir-locals.el to the $PYTHONPATH environment variable.

The .dir-locals.el file should be placed in the root directory of a Python project.

File name: .dir-locals.el

;; -*- mode: emacs-lisp; -*-
;; File: .dir-locals.el
;; Description:
;; This file adds the path where `.dir-locals.el` is located to the
;; `$PYTHONPATH` environment variable to ensure that processes executed by
;; Emacs and its packages, such as Flycheck or Flymake, can access the Python
;; modules of a project.
;;
;; Author: James Cherti
;; License: MIT
;; URL: https://www.jamescherti.com/emacs-dir-locals-add-path-to-pythonpath/

((python-mode . ((eval . (progn
                           (let ((project_path
                                  (car (dir-locals-find-file
                                        (buffer-file-name))))
                                 (python_path_env (getenv "PYTHONPATH")))
                             (setq-local process-environment
                                         (cons
                                          (concat "PYTHONPATH="
                                                  project_path
                                                  (if python_path_env
                                                      (concat ":" python_path_env)
                                                    ""))
                                          process-environment))))))))
Code language: Lisp (lisp)

A Git Tool that can decide whether to use ‘git mv’ or ‘mv’ to move files and/or directories

The git-smartmv command-line tool, written by James Cherti, allows moving files and/or directories without having to worry about manually choosing whether to use mv or git mv.

  • If the file or directory is being moved within the same Git repository, git-smartmv uses git mv.
  • If the file or directory is being moved between a Git repository and a non-Git directory or a different Git repository, git-smartmv uses mv.

Installation

sudo pip install git-smartmvCode language: plaintext (plaintext)

Shell alias

To simplify the usage of this tool, you can add the following line to your ~/.bashrc:

alias mv="git-smartmv"Code language: plaintext (plaintext)

Usage

The git-smartmv command-line tool accepts similar arguments as the mv command, including the source file or directory to be moved, and the destination file or directory.

Example:

git smartmv file1 file2 directory/

Second example (rename):

git smartmv file1 file2

Links related to git-smartmv

Helper script to upgrade Arch Linux

In this article, we will be sharing a Python script, written by James Cherti, that can be used to upgrade Arch Linux. It is designed to make the process of upgrading the Arch Linux system as easy and efficient as possible.

The helper script to upgrade Arch Linux can:

  • Delete the ‘/var/lib/pacman/db.lck’ when pacman is not running,
  • upgrade archlinux-keyring,
  • upgrade specific packages,
  • download packages,
  • upgrade all packages,
  • remove from the cache the pacman packages that are no longer installed.

The script provides a variety of options and is perfect for those who want to automate the process of upgrading their Arch Linux system (e.g. execute it from cron) and ensure that their system is always up to date.

Requirements: psutil
Python script name: archlinux-update.py

#!/usr/bin/env python
# Author: James Cherti
# License: MIT
# URL: https://www.jamescherti.com/script-update-arch-linux/
"""Helper script to upgrade Arch Linux."""

import argparse
import logging
import os
import re
import subprocess
import sys
import time

import psutil


class ArchUpgrade:
    """Upgrade Arch Linux."""

    def __init__(self, no_refresh: bool):
        self._download_package_db = no_refresh
        self._keyring_and_pacman_upgraded = False
        self._delete_pacman_db_lck()

    @staticmethod
    def _delete_pacman_db_lck():
        """Delete '/var/lib/pacman/db.lck' when pacman is not running."""
        pacman_running = False
        for pid in psutil.pids():
            try:
                process = psutil.Process(pid)
                if process.name() == "pacman":
                    pacman_running = True
                    break
            except psutil.Error:
                pass

        if pacman_running:
            print("Error: pacman is already running.", file=sys.stderr)
            sys.exit(1)

        lockfile = "/var/lib/pacman/db.lck"
        if os.path.isfile(lockfile):
            os.unlink(lockfile)

    def upgrade_specific_packages(self, package_list: list) -> list:
        """Upgrade the packages that are in 'package_list'."""
        outdated_packages = self._outdated_packages(package_list)
        if outdated_packages:
            cmd = ["pacman", "--noconfirm", "-S"] + outdated_packages
            self.run(cmd)

        return outdated_packages

    def _outdated_packages(self, package_list: list) -> list:
        """Return the 'package_list' packages that are outdated."""
        outdated_packages = []
        try:
            output = subprocess.check_output(["pacman", "-Qu"])
        except subprocess.CalledProcessError:
            output = b""

        for line in output.splitlines():
            line = line.strip()
            pkg_match = re.match(r"^([^\s]*)\s", line.decode())
            if not pkg_match:
                continue

            pkg_name = pkg_match.group(1)
            if pkg_name in package_list:
                outdated_packages += [pkg_name]

        return outdated_packages

    @staticmethod
    def upgrade_all_packages():
        """Upgrade all packages."""
        ArchUpgrade.run(["pacman", "--noconfirm", "-Su"])

    def download_all_packages(self):
        """Download all packages."""
        self.download_package_db()
        self.run(["pacman", "--noconfirm", "-Suw"])

    def download_package_db(self):
        """Download the package database."""
        if self._download_package_db:
            return

        print("[INFO] Download the package database...")
        ArchUpgrade.run(["pacman", "--noconfirm", "-Sy"])
        self._download_package_db = True

    def upgrade_keyring_and_pacman(self):
        self.download_package_db()

        if not self._keyring_and_pacman_upgraded:
            self.upgrade_specific_packages(["archlinux-keyring"])
            self._keyring_and_pacman_upgraded = True

    def clean_package_cache(self):
        """Remove packages that are no longer installed from the cache."""
        self.run(["pacman", "--noconfirm", "-Scc"])

    @staticmethod
    def run(cmd, *args, print_command=True, **kwargs):
        """Execute the command 'cmd'."""
        if print_command:
            print()
            print("[RUN] " + subprocess.list2cmdline(cmd))

        subprocess.check_call(
            cmd,
            *args,
            **kwargs,
        )

    def wait_download_package_db(self):
        """Wait until the package database is downloaded."""
        successful = False
        minutes = 60
        hours = 60 * 60
        seconds_between_tests = 15 * minutes
        for _ in range(int((10 * hours) / seconds_between_tests)):
            try:
                self.download_package_db()
            except subprocess.CalledProcessError:
                minutes = int(seconds_between_tests / 60)
                print(
                    f"[INFO] Waiting {minutes} minutes before downloading "
                    "the package database...",
                    file=sys.stderr,
                )
                time.sleep(seconds_between_tests)
                continue
            else:
                successful = True
                break

        if not successful:
            print("Error: failed to download the package database...",
                  file=sys.stderr)
            sys.exit(1)


def parse_args():
    """Parse the command-line arguments."""
    usage = "%(prog)s [--option] [args]"
    parser = argparse.ArgumentParser(description=__doc__.splitlines()[0],
                                     usage=usage)
    parser.add_argument("packages",
                        metavar="N",
                        nargs="*",
                        help="Upgrade specific packages.")

    parser.add_argument(
        "-u",
        "--upgrade-packages",
        default=False,
        action="store_true",
        required=False,
        help="Upgrade all packages.",
    )

    parser.add_argument(
        "-d",
        "--download-packages",
        default=False,
        action="store_true",
        required=False,
        help="Download the packages that need to be upgraded.",
    )

    parser.add_argument(
        "-c",
        "--clean",
        default=False,
        action="store_true",
        required=False,
        help=("Remove packages that are no longer installed from "
              "the cache."),
    )

    parser.add_argument(
        "-n",
        "--no-refresh",
        default=False,
        action="store_true",
        required=False,
        help=("Do not download the package database (pacman -Sy)."),
    )

    parser.add_argument(
        "-w",
        "--wait-refresh",
        default=False,
        action="store_true",
        required=False,
        help=("Wait for a successful download of the package database "
              "(pacman -Sy)."),
    )

    return parser.parse_args()


def command_line_interface():
    """The command-line interface."""
    logging.basicConfig(level=logging.INFO, stream=sys.stdout,
                        format="%(asctime)s %(name)s: %(message)s")

    if os.getuid() != 0:
        print("Error: you cannot perform this operation unless you are root.",
              file=sys.stderr)
        sys.exit(1)

    nothing_to_do = True
    args = parse_args()
    upgrade = ArchUpgrade(no_refresh=args.no_refresh)

    if args.wait_refresh:
        upgrade.wait_download_package_db()
        nothing_to_do = False

    if args.packages:
        print("[INFO] Upgrade the packages:", ", ".join(args.packages))
        upgrade.upgrade_keyring_and_pacman()
        if not upgrade.upgrade_specific_packages(args.packages):
            print()
            print("[INFO] The following packages are already up-to-date:",
                  ", ".join(args.packages))
        nothing_to_do = False

    if args.download_packages:
        print("[INFO] Download all packages...")
        upgrade.download_all_packages()
        nothing_to_do = False

    if args.upgrade_packages:
        print("[INFO] Upgrade all packages...")
        upgrade.upgrade_keyring_and_pacman()
        upgrade.upgrade_all_packages()

        nothing_to_do = False

    if args.clean:
        print("[INFO] Remove packages that are no longer installed "
              "from the cache...")
        upgrade.clean_package_cache()
        nothing_to_do = False

    if nothing_to_do:
        print("Nothing to do.")
        print()

    sys.exit(0)


def main():
    try:
        command_line_interface()
    except subprocess.CalledProcessError as err:
        print(f"[ERROR] Error {err.returncode} returned by the command: "
              f"{subprocess.list2cmdline(err.cmd)}",
              file=sys.stderr)
        sys.exit(1)


if __name__ == '__main__':
    main()Code language: Python (python)

Python: Extract variables/values from source code comments

The source code in this article can be used to extract variables and values from source code comments. The code is written in Python and uses a combination of regular expressions and Python’s built-in string functions to extract specific information from source code comments.

#!/usr/bin/env python
# Author: James Cherti
# License: MIT
# URL: https://www.jamescherti.com/python-extract-variables-values-from-source-code-comments/
"""Extract variables/values from source code comments."""

import re
from typing import Dict


def get_variables_from_comments(
        source_code_content: str,
        comment_pattern: str = r'[^\w\s]+') -> Dict[str, list]:
    """Extract variables/values from source code comments.

    Source code example:
        #!/usr/bin/env python
        # This is a simple comment.
        print("Hello world")
        #
        # myvar: value 1
        # myvar: value 2
        # myvar: value 3
        # AnotherVar: value 1

    Here is how to extract the variables and their values from the
    source code above:
    >>> get_variables_from_comments(source_code_content)
    {'AnotherVar': ['value 1'], 'myvar': ['value 1', 'value 2', 'value 3']}

    """
    source_code_lines = source_code_content.splitlines()

    result: Dict[str, list] = {}
    for line in source_code_lines:
        re_str = (r'^\s*' +
                  comment_pattern +
                  r'\s*([\w\d]+)\s*:\s*(.*)\s*$')
        match_result = re.search(re_str, line)
        if match_result:
            var_name = match_result.group(1)
            var_value = match_result.group(2)

            if var_name not in result:
                result[var_name] = []

            result[var_name].append(var_value)

    return result


def main():
    """Try the method 'get_variables_from_comments()'."""

    source_code = (
        "#!/usr/bin/env python\n"
        "# This is a simple comment.\n"
        "print(\"Hello world\")\n"
        "#\n"
        "# myvar: value 1\n"
        "# myvar: value 2\n"
        "#\n"
        "# myvar: value 3\n"
        "# AnotherVar: value 1\n"
    )

    __import__('pprint').pprint(get_variables_from_comments(
        source_code_content=source_code,
        comment_pattern=re.escape('#'))
     )


if __name__ == '__main__':
    main()Code language: Python (python)

Python: Tab completion against a list of strings (readline)

#!/usr/bin/env python
# License: MIT
# Author: James Cherti
# URL: https://www.jamescherti.com/python-tab-completion-readline-against-list/
"""Tab completion against a list of strings (readline)"""

import readline
from typing import Any, List, Union


class ReadlineCompleter:
    """A readline completer."""

    def __init__(self, options: List[str]):
        """Store the options = ['word1', 'word2']."""
        readline.set_completer_delims('')
        self.options = options
        self.matches: List[str] = []

    def complete(self, _, state):
        """Complete a readline sentence."""
        if state == 0:
            origline = readline.get_line_buffer()
            begin = readline.get_begidx()
            end = readline.get_endidx()
            being_completed = origline[begin:end]
            words = origline.split()

            if not words:
                self.matches = self.options[:]
            else:
                try:
                    if begin == 0:
                        matches = self.options[:]  # First word
                    else:
                        first = words[0]  # Later word
                        matches = self.options[first]

                    if being_completed:
                        # Match options with portion of input
                        # being completed
                        self.matches = [w for w in matches
                                        if w.startswith(being_completed)]
                    else:
                        # Matching empty string so use all candidates
                        self.matches = matches
                except (KeyError, IndexError):
                    self.matches = []

        try:
            return self.matches[state]
        except IndexError:
            return None


def input_completion(prompt: Any,
                     list_options: Union[None, List[str]] = None):
    """Read a string from standard input and complete against 'list_options'.

    The trailing newline is stripped. The prompt string is printed to
    standard output without a trailing newline before reading input.

    If the user hits EOF (*nix: Ctrl-D, Windows: Ctrl-Z+Return), raise
    EOFError. On *nix systems, readline is used if available.

    """
    readline.parse_and_bind('tab: complete')
    if list_options is None:
        list_options = []

    save_completer = readline.get_completer()
    try:
        readline.set_completer(
            ReadlineCompleter(list_options).complete
        )
        return input(prompt)
    finally:
        readline.set_completer(save_completer)


def main():
    """Try input_completion()."""
    list_options = ["yes", "no", "cancel"]
    value = input_completion("Proceed (press the Tab key)? ",
                             list_options=list_options)
    print("Value:", value)


if __name__ == "__main__":
    main()Code language: Python (python)

A tool to Execute a Command in a new Tmux Window

The Python script tmux-run.py allows executing a command in a new tmux window. A tmux window is similar to a tab in other software.

If the script is executed from within a tmux session, it creates a tmux window in the same tmux session. However, if the script is executed from outside of a tmux session, it creates a new tmux window in the first available tmux session.

(Requirement: libtmux)

The Python script: tmux-run.py

#!/usr/bin/env python
# License: MIT
# Author: James Cherti
# URL: https://www.jamescherti.com/python-script-run-command-new-tmux-window/
"""Execute a command in a new tmux window.

This script allows executing a command in a new tmux window (a tmux window is
similar to a tab in other software).

- If it is executed from within a tmux session, it creates a tmux window
in the same tmux session.
- However, if the script is executed from outside of a tmux
session, it creates a new tmux window in the first available tmux session.

"""

import os
import shlex
import shutil
import sys

import libtmux


SCRIPT_NAME = os.path.basename(sys.argv[0])


def parse_args():
    if len(sys.argv) < 2:
        print(f"Usage: {SCRIPT_NAME} <command> [args...]",
              file=sys.stderr)
        sys.exit(1)

    args = sys.argv[1:]
    args[0] = shutil.which(args[0])
    if args[0] is None:
        print(f"{SCRIPT_NAME}: no {args[0]} in "
              f"({os.environ.get('PATH', '')})", file=sys.stderr)
        sys.exit(1)

    return args


def get_tmux_session():
    tmux_server = libtmux.Server()
    if not tmux_server.sessions:
        print(f"{SCRIPT_NAME}: the tmux session was not found",
              file=sys.stderr)
        sys.exit(1)

    tmux_session_id = os.environ["TMUX"].split(",")[-1]
    if tmux_session_id:
        try:
            return tmux_server.sessions.get(id=f"${tmux_session_id}")
        except Exception:  # pylint: disable=broad-except
            pass

    return tmux_server.sessions[0]


def run_in_tmux_window():
    try:
        command_args = parse_args()
        tmux_session = get_tmux_session()
        command_str = shlex.join(command_args)
        tmux_session.new_window(attach=True, window_shell=command_str)
    except libtmux.exc.LibTmuxException as err:
        print(f"Error: {err}.", file=sys.stderr)
        sys.exit(1)


if __name__ == '__main__':
    run_in_tmux_window()


Code language: Python (python)

How to make Vim edit/diff files from outside of Vim? (e.g. from a shell like Bash, Zsh, Fish..)

The Vim editor offers the ability to connect to a Vim server and make it perform various tasks from outside of Vim. The command-line tools vim-client-edit, vim-client-diff and the vim_client Python module, written by James Cherti, can be used to easily find and connect to a Vim server and make it perform the following tasks:

  • Edit files or directories in new tabs (The command-line tool vim-client-edit),
  • Diff/Compare up to eight files (The command-line tool vim-client-diff),
  • Evaluate expressions and return their result (The Python module vim_client),
  • Send commands and expressions to Vim (The Python module vim_client).

The command-line tools vim-client-edit and vim-client-diff are especially useful when a quick edit or comparison needs to be performed on a file from outside of Vim (e.g. from a shell like Bash, Zsh, Fish, etc.).

Additionally, the vim_client Python module allows running expressions on a Vim server and retrieving their output, which can be useful for automating tasks or scripting. For example, you can use vim-client to run a search and replace operation on a file or directory, or to perform a complex diff operation between two files.

Overall, vim-client is a powerful tool for interacting with Vim from the vim-client-edit and vim-client-diff command-line tools. The vim_client Python module can also be used to run and retrieve the output of Vim expressions, which can help automate various tasks.

Please star vim-client on GitHub to support the project!

Requirements

To use vim-client, you will need to have Vim and Python installed on your system.

Installation

The vim-client package can be installed with pip:

$ sudo pip install vim-clientCode language: Bash (bash)

Execute Vim server

The Vim editor must be started with the option “–servername”, which enables the Vim server feature that allows clients to connect and send commands to Vim:

$ vim --servername SERVERNAMECode language: plaintext (plaintext)

Make Vim server edit multiple files in tabs

Editing a list of files in new tabs:

$ vim-client-edit file1 file2 file3 

Make Vim server diff files (like vimdiff)

Comparing/diff up to eight files:

$ vim-client-diff file1 file2

Useful ~/.bashrc aliases:

Adding the following aliases to ~/.bashrc is recommended as it makes it easy to execute the command-line tools vim-client-edit and vim-client-diff:

alias gvim=vim-client-edit
alias vim=vim-client-edit
alias vi=vim-client-edit
alias vimdiff=vim-client-diff

Links related to vim-client

Vim: Open documentation in a new tab for the word under the cursor (Vim help, Python, man pages, Markdown, Ansible…)

The following Vim script (VimL) function can be used to make Vim open the documentation of the word under the cursor in a new tab for various languages and tools such as Vim help (:help), Python (Pydoc), Markdown (sdcv dictionary), man pages (Vim’s built-in ‘:Man’), and Ansible (ansible-doc).

The VimL function is also extensible, meaning that you can adapt it to work with any other documentation tool. By default, the key mapping upper-case “K” can be used to open the documentation for the word under the cursor in a new tab.

" Language: Vim script
" Author: James Cherti
" License: MIT
" Description: Vim: open help/documentation in a new tab 
"              (Vim script, Python, Markdown, man pages, Ansible...).
"              Press upper-case K to open help for the word under the cursor.
" URL: https://www.jamescherti.com/vim-open-help-documentation-in-a-new-tab/

function! TabHelp(word) abort
  let l:cmd = ''

  let l:tabhelpprg = get(b:, 'tabhelpprg', '')
  if l:tabhelpprg ==# ''
    normal! K
    return
  endif

  if l:tabhelpprg[0] ==# ':'
    if stridx(l:tabhelpprg, '%s') ==# -1
      execute l:tabhelpprg
    else
      execute printf(l:tabhelpprg, fnameescape(a:word))
    endif
    return
  else
    let l:cmd = 'silent read! '
    if stridx(l:tabhelpprg, '%s') ==# -1
      let l:cmd .= l:tabhelpprg
    else
      let l:cmd .= printf(l:tabhelpprg, shellescape(a:word))
    endif
  endif

  execute 'silent tabnew help:' . fnameescape(a:word)

  setlocal modifiable
  silent normal! ggdG
  silent normal! 1Gdd
  if l:cmd !=# ''
    execute l:cmd
  endif
  silent normal! gg0
  setlocal nomodifiable
  setlocal noswapfile
  setlocal nowrap
  setlocal nonumber
  setlocal nomodified
  setlocal buftype=nofile
  setlocal bufhidden=delete
  if exists('&relativenumber')
    setlocal norelativenumber
  endif
  if exists('&signcolumn')
    setlocal signcolumn=no
  endif
  setlocal nofoldenable
  setlocal foldcolumn=0
endfunction

augroup TabHelp
  autocmd!
  autocmd FileType vim let b:tabhelpprg = ':tab help %s'
  autocmd FileType sh,zsh,csh if ! exists(':Man') | runtime ftplugin/man.vim | endif | let b:tabhelpprg = ':tab Man %s'
  autocmd FileType yaml.ansible if executable('ansible-doc') | let b:tabhelpprg = 'ansible-doc %s' | endif
  autocmd FileType markdown if executable('sdcv') | let b:tabhelpprg = 'sdcv %s' | endif
  autocmd FileType vim,sh,zsh,csh,yaml.ansible,markdown nnoremap <silent> <buffer> K :call TabHelp(expand('<cword>'))<CR>
augroup ENDCode language: Vim Script (vim)

Python: Read the shebang line of a script

#!/usr/bin/env python
# Author: James Cherti
# License: MIT
# URL: https://www.jamescherti.com/python-read-the-shebang-line-of-a-script/
"""Read the shebang line of a script."""

import sys
import os
import shlex
from pathlib import Path
from typing import Union


class ShebangError(Exception):
    """Error with the method read_shebang()."""


def read_shebang(script_path: Union[Path, str]) -> list:
    """Return the shebang line of a file.

    >>> shebang("file.sh")
    ['/usr/bin/env', 'bash']

    """
    with open(script_path, "rb") as fhandler:
        line = fhandler.readline().strip().decode()

    if len(line) > 2 and line[0:2] == '#!':
        shebang_split = shlex.split(line[2:].strip())
        if not Path(shebang_split[0]).is_file():
            raise ShebangError(f"the shebang '{shebang_split}' does not exist")

        if not os.access(shebang_split[0], os.X_OK):
            raise ShebangError(f"the shebang '{shebang_split}' is not "
                               "executable")

        return shebang_split

    raise ShebangError("the shebang line was not found")

    
if __name__ == "__main__":
    try:
        print(read_shebang(sys.argv[1]))
    except IndexError:
        print(f"Usage: {sys.argv[0]} <file>", file=sys.stderr)
        sys.exit(1)Code language: Python (python)

Python: Calculate the size of a directory and its sub-directories

#!/usr/bin/env python
# Author: James Cherti
# License: MIT
# URL: https://www.jamescherti.com/python-calculate-the-size-of-a-directory-and-its-sub-directories/
"""Calculate the size of a directory and its sub-directories."""

import os
from pathlib import Path
from typing import Union

def get_size(path: Union[Path, str], include_dirs_size=True) -> int:
    """Return the size of a file or a directory in bytes."""
    path = Path(path)
    size = 0

    if path.is_dir():
        list_paths = path.glob("**/*")
    elif path.is_file():
        list_paths = [path]  # type: ignore
    else:
        list_paths = []  # type: ignore

    for cur_path in list_paths:
        if not include_dirs_size and cur_path.is_dir():
            continue

        if not cur_path.is_symlink():
            size += cur_path.stat().st_size

    return sizeCode language: Python (python)